
Basic Stereo Location Recording | Setup, Recording, and Editing
- Oct 18, 2023
- 11 min read
While teaching an "Audio-Video for Musicians" course at FSU, I created a number of helpful resources for the students to guide them outside of class. This guide walks the user through the process of setting up, recording, and editinga basic stereo location recording session.
Gear List
- Laptop Specifications
- 8 GB of RAM
- 2 GB of GPU memory
- Windows 10 or later
- Adobe Audition (or similar DAW)
Setting up the Microphones
Start by extending the legs of the tripod microphone stand.

Figure 1
Screw the stereo bar onto the top joint of the microphone stand.

Figure 2
Attach the microphone mounts to the stereo bar, between 18 and 24 inches apart. Carefully place the microphones into the microphone mounts. Route the microphone cables similar to the illustration in Figure 2. This will ensure that if either microphone falls out of the mount, it will not hit the floor, as seen in Figure 3.


Figure 3. Securing mic cables to stand
Plug in each microphone and secure it to the microphone mount.

Figure 4. Plugging in and securing the microphones on the stand
Adjust the angles until each mic is parallel to the floor and pointing straight. During the microphone setup process, the microphones should be saved for last to reduce the risk of accidental damage.
Microphone Choice & Placement
The most appropriate microphone choice for capturing this type of sound is a stereo pair of omnidirectional condenser microphones in an AB configuration. Stereo AB is best achieved using a stereo bar mounted on a tripod microphone stand. The two microphones should be 12 to 24 inches apart.

Figure 5. Stereo AB on a stereo bar (DPA Microphones 2019)
Consider where a trusted listener might stand if they were listening to the performer—not so close as to invade the performer’s space, but not so far away that they cannot distinguish elements of sound production and performance. As a default starting position, place the microphones about 8 feet in front of the performer and between 7 and 8 feet in height. The microphones should be centered (performer in the middle, between the two microphones from array perspective). If necessary to utilize spot mic(s), place cardioid condenser microphone(s) two to three feet in front of the performer and pointed directly where fundamental sound is produced—for example, directly at a saxophone bell. If this results in too much extraneous sound (key and pad clicks), try moving the microphone back or angling it slightly above the sound source. Additional considerations include locating the microphone in a position maintaining line of sight/sound without the interference and potential diffusion of a music stand.
Configuring the Audio Interface (Focusrite 2i2 3rd gen)
Once the microphone or microphones are set up, the next step is routing them into the audio interface. In stereo recordings, it is standard to label the microphones from left to right, facing the instrument. From the audience’s perspective, the leftmost microphone should be plugged into input 1 on the audio interface, and the rightmost microphone into input 2.

Figure 6. Plugging the microphones into the audio interface
Keeping track of mics 1 and 2 can be made easier by labeling the microphone cables with tape and numbers.


Figure 7. Microphone cables labeled 1 and 2 with tape
Before powering the interface on, it is essential to download the proper drivers to the computer, which can be done with a simple internet search using the interface brand and model number, followed by the word “drivers.” The drivers are Mac and Windows-specific, so be sure to download the correct file. Once the file is downloaded, the audio interface will be able to interact with the computer as an audio input and output source. Input means the microphones can record sound into the computer, and output means the computer sound can be heard by plugging headphones into the interface. The final step includes plugging the interface in to the computer USB or AC adapter and turning on 48V phantom power.
Setting up the Digital Audio Workstation (Adobe Audition)
To produce a stereo recording with two microphones, it is necessary to record using a multitrack session, with each microphone routed to separate tracks (a new multitrack session can be built in Adobe Audition using the shortcut CTRL+N).

Figure 8. Starting a New Multitrack Session in Adobe Audition
Name the file, determine the save location (typically an internal, rather than external—which should be used as a backup), set the sample rate to 48 kHz, bit rate to 24, and mix to stereo.

Figure 30. Adobe Audition, File Name, Save Location, Sample Rate, Bit Depth, Stereo
Audio Hardware Preferences
The audio hardware preferences define which devices will be used for input and output. If these preferences are set incorrectly, the DAW will likely default to the computer’s built-in microphones for input, and the computer speakers for output—this is very important to avoid. Input should be set to the audio interface connected to the computer, and output to either the headphone jack of the computer or the interface (which defaults to the headphone jack and outputs of the interface. In Adobe Audition, navigate to Edit>Preferences>Audio Hardware, as seen below. Though this process can be a trial and error, if the microphones are not recording, the issue likely lies within the audio hardware preferences. For Windows users, the Device Class will likely be set to ASIO, and CoreAudio on Mac.

Figure 9. Audio Hardware Preferences in Adobe Audition (PC)
Assigning the Mics to Interface Channels
To create a stereo recording in a multitrack session, the microphones must be assigned to individual mono tracks, which are then panned to the right and left to create a stereo effect (not individual stereo tracks). In Adobe Audition, this is done in the Editor panel, as seen below. For a stereo recording with two microphones, track 1 should be assigned to channel 1 on the audio interface, and track 2 to channel 2.
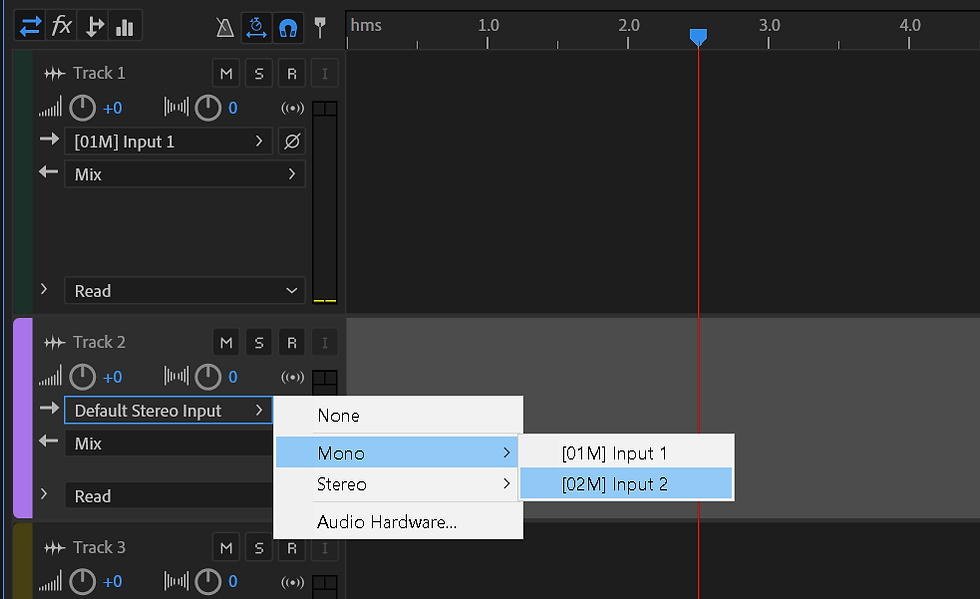
Figure 11. Assigning Mics to Tracks in Adobe Audition
Panning the Mics
Stereo playback is achieved by panning the mics to the right and left. In Adobe Audition, this is done inside the track pane, as seen below. Track 1 is panned to the left (the leftmost microphone), and track 2 to the right.

Figure 12. Panning the Tracks to the Left and Right Channels in Adobe Audition
Arming the Tracks to Record
The tracks must also be armed to record, which is also done in the track pane. In tracks 1 and 2, click the “R” in the top right of the track pane to enable the tracks to record.

Figure 13. Arming Tracks to Record in Adobe Audition
Input Levels
Input level refers to the sensitivity of microphone capture. Input levels are set using audio interface preamps (the knobs on the physical interface). When recording, it is essential to set the input levels of each microphone appropriately to achieve a balanced signal. If the strength of the signal (input level) is not high enough, sound properties will not be captured effectively enough to be reproduced—too much of the room and too little of the sound source, also known as the signal to noise ratio. Alternatively, setting input levels too high can result in distortion (clipping). Input levels should not be confused with “volume,” which refers to the output level when playing back recordings through speakers or headphones. In stereo recordings, input levels should be set identically for both channels to produce a balanced sound from left to right.
Most sound engineers recommend setting input levels based on the loudest musical material being recorded, with the loudest sound between -12 and -9dB. Setting levels in this way produces the greatest signal-to-noise ratio and provides enough headroom to compensate for overplaying during the session.3 When setting input levels, have the performer play the loudest part of the piece two to three times. The input levels should be adjusted until the loudest point in the waveform is between -12 and -9dB on both tracks.
3 Headroom refers to the space between the top of the waveform and 0dB.

Figure 14. Headroom
One common question among audio engineers concerns whether or not input levels should be adjusted for each tune. If the input levels were adjusted to reach the -9dB threshold for every piece, there would be no difference in volume between loud and soft pieces. For this reason, it is recommended that input levels stay set throughout the entire recording session. If multiple works are recorded in the same session, apply the headroom principle to the loudest phrases of the loudest work on the session.
Playback Levels
Playback level, or output volume, refers to how loud the sound is when played back and can be adjusted within the multitrack session. If the headphones are connected to the audio interface, the playback volume can be further adjusted using the headphone level knob on the interface.

Figure 15. Adjusting Output (Playback) Levels in Adobe Audition
Mixing
Mixing refers to the left and right balance of tracks in a multitrack recording. For stereo recordings with only two microphones, the mics are typically panned 100% to their respective sides, as described above. When spot mics are used, it is recommended that the track be panned to reflect the performers position in the overall stereo image.
When mixing overheads (omnidirectional condensers) with more than one cardioid “spot” mic, use the overheads to guide the stereo image. During playback, “solo” the primary overhead tracks and listen carefully to the directionality of the recording (the solo function is marked with an S button in the track pane). The spot mic track(s) should be panned to match the stereo image of the overheads as closely as possible.
Multitrack Mixdown
Mixdown, or bouncing, is the process of exporting multiple tracks in one stereo track. This stereo track retains the same directionality heard in the multitrack session. To bounce a multitrack session in Adobe Audition, use CTRL+SHIFT+E, or go to File>Export>Multitrack Mixdown>Entire Session.

Figure 16. Exporting a Multitrack Mixdown in Adobe Audition
The file should be exported as a WAV4 file with the same settings as the original multitrack session.

Figure 17. Export Multitrack Mixdown Settings
In the resulting stereo mixdown, the top waveform represents the left channel, and the bottom the right channel.

Figure 18. Stereo Mixdown of a Multitrack Session
Normalization
Normalization entails boosting the output level of the entre recording to a target level. Doing so does not change the signal-to-noise ratio because the relative dynamics are unchanged between selections or pieces recorded. If the input levels did not change for the entirety of the recording, normalization should be applied to the entire recording. For the same reason that 9dB of headroom was left to prevent clipping, normalization should not be applied more than 90% to compensate for the potetial of distortion during playback. In Adobe Audition, normalization can be achieved by navigating to Effects>Amplitude and Compression>Normalize (Process). It is important to note that the entire audio or video recording should be normalized (or not) in order to have adjudicators or listeners experience the entire recording at one playback volume, allowing louder sections and soteer sections heard without playback adjustment.

Figure 19. Normalization in Adobe Audition

Figure 20. Normalizing to 90% in Adobe Audition
Notice the differences in the height of the waveforms.

Figure 21. Stereo Mixdown before Normalization

Figure 22. Stereo Mixdown after Normalization
Noise Reduction
Oftentimes, quieter wind instrument input levels, e.g., oboe or bass clarinet, may capture unwanted room noise. Noise Reduction (NR) is a form of processing in which a room noise sample, or noise print, is taken and effectively cancelled digitally after input levels have been set. The noise print must be sampled from the noise floor—in other words, when no sounds of the instrument or performance (or talking, or random noises such as doors closing, footsteps, etc.) are present. For safety and flexibility in post production, add 10-15 seconds of silence at the beginning of the session solely dedicated to capturing an accurate and consistent noise print. In Adobe Audition, this silence can be identified using the Spectral Frequency Display.

Figure 23. Spectral Frequency Display for Identifying Noise Print
To capture the noise print in Adobe Audition, highlight 10-15 seconds of silence, use SHIFT+P, or go to Effects>Noise Reduction>Restoration>Capture Noise Print.

Figure 24. Capturing the Noise Print in Adobe Audition
Next, Use CTRL+SHIFT+P, or use the same path, choosing Noise Reduction (Process).
This will activate the Noise Reduction Processing Panel, which displays the effects the noise reduction will have on the recording. If all of the waves are under the blue line, the frequency spectrum exhibited by the instrument will not be negatively affected. It is recommended that the editor apply no more than 75% noise reduction.

Figure 25. Applying Noise Reduction in Adobe Audition
Spot Removal
Another form of noise reduction, known as spot removal, can be used to eliminate extraneous sounds such as door slams, coughs, chair squeaks, and other sounds that could occur during a recording session—similar to a spot healing brush in photo editing software such as Photoshop.
To remove a sound using the spot removal tool, open the spectral frequency display using SHIFT+D, B to activate the Spot Removal Brush Tool, and adjust the brush size using the slider at the top of the screen. In this example, the undesired sound is a door slam heard in the background.

Figure 26. Identifying unwanted sound using spectral frequency display
Click, hold, and drag the mouse over the undesired sound, careful not to eliminate any instrument sound.

Figure 27. Removing undesired sounds using the spot removal brush

Figure 28. Results of spot removal tool
Spot Mics (Using More Than 2 Microphones)
Placing additional microphones closer to the sound source can bring out properties of sound associated with articulation, as well as the lower frequencies. This microphone, when placed closer to the sound source, is known as a “spot mic,” because it is placed in a specific “spot” to capture MORE of a particular sound. Spot-miking is a great way to provide manipulability in post-production, as it allows the engineer to create a balance between the room mics and the spot mic(s).
Whereas room mics typically consist of a pair of omnidirectional small diaphragm condenser microphones (sE8, for example), it is best to use large diaphragm condenser mics with a cardioid polar pattern for spot miking (AKG C3000, for example). Large Diaphragm Condensers are more sensitive, meaning that the input levels can be set much lower to improve the signal to noise ratio. Spot mics should be placed between 2-3 feet from the sound source, and placed at an angle and pointed directly at the primary point of sound production. For example, on a trumpet, the spot mic would be 2-3 feet in front of the instrument, but placed to the right or left by 1-2 feet to avoid being directly in front of the bell. Putting the mic directly in front of the bell will force the engineer to push the input signals so low that many of the properties of sound needed for mixing will not be captured. Placing it at an angle ensures that the entire gamut of frequencies is captured equally without pushing the input levels too low.
Concerning capture, there is no difference when setting levels of spot mics vs. overheads (the stereo pair of room mics).
Aligning the Slate
A “slate” is a series of loud claps to create a spike in the audio waveform. This attack can be used to align the starting point of audio for each microphone in post-production. used to align the sound of additional mics with the overheads. In the multitrack session, locate the slate and zoom in until the timing difference is visible, as seen below.
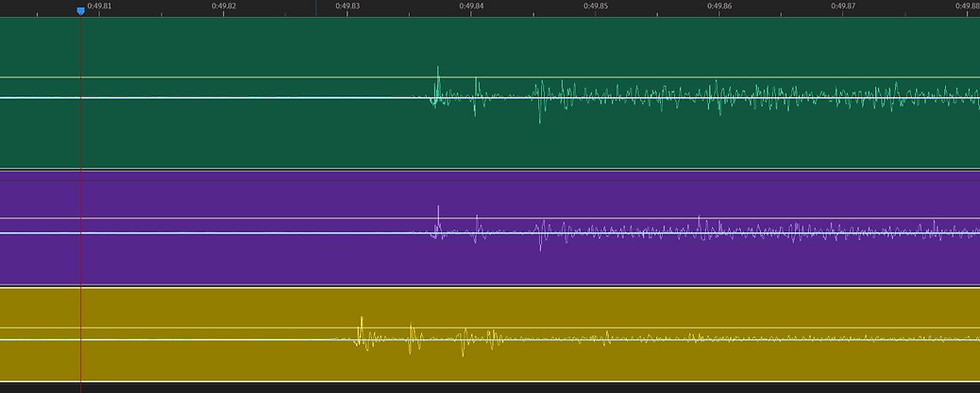
Figure 29. Slate up close in Adobe Audition
In Adobe Audition, all of the audio for a given track can be selected simultaneously.

Figure 30. Selecting all clips in a single track
Move the tracks to the right until they are perfectly aligned with the overheads, as seen below.

Figure 42. All tracks in slate aligned
Additional Resources
I made an entire video series on a variety of recording topics. While many of them have a focus primarily on percussion recording, the concepts discussed are largely universal in teh world of audio recording. Use the links below to learn more about the topics discussed!
Questions?
Send me an email at justinballrecording@gmail.com and let's start a conversation!


Great video tutorial! Thank you.
What did you use to record your screen along with the microphone? I've tried several programs but nothing works for me. Last time I came across an article that talks about it and I want to try it.
I could use a few tips from you.